Thursday, 16 January 2014

FOAM

This material is unusual when you really start to think about the way in which it moves (is able to bend and shape in relation to other materials). 
Aesthetics
Initially i wanted to create the house using four different colors of foam. However i felt that this would distort or draw away the attention form the models dimensions an form. As a result i was able to obtain a perfect house model that looked pleasing to the eye. If you were to place this particular model against a white background the result would be much more appealing than say the picture below (beech wood table).

The construction approach
-Using one sheet (16cmx20cm) i marked the four desired shapes. Pencil doesn't show clearly on black foam so i used red pen and a ruler for straight edges. From this i then cut out the shapes using scissors.
What was vital in the marking and cutting out however was understanding that in order to sustain precision, i have to remove 5mm or so from n edge. This was because when joining the pieces at their edges more width was added.
-i tried different techniques for connecting together the pieces however found the best method was sellotape. Obviously this doesn't look to great on the outside but workd great in holding the structure firmly together.


Tuesday, 14 January 2014

TINFOIL


The tin foil house soon became the most challenging of all my models simply down to its delicate structure and capability to tear easily. This property of the material narrowed down the amount of construction ways possible, for instance using complex joints would not work. I soon realized the only realistic way of doing this would be to create the net and join using flaps...

The construction approach.
The only way that i felt the model could be made strongest and most stable was by using the net method. I tested joining processes with prit stick and soon found that it wasn't enough to hold it together. My reply to this was transparent sellotape. The aesthetics to me were most important with this particular material. It shiny reflective surface and indented structure looks beautiful when light is portrayed upon it.


evaluation of material.

Tinfoil isn't the strongest of materials, intact its completely on the other end of the scales. The name tells me what the material is formed of... its simply a thin foil sheet of tin (extremely thin in fact) 0.0052cm thick. This feature of the material means that it it is extremely malleable - means the foil can easily be shaped.

TRANSLUCENT ACRYLIC


By translucent I mean that you can slightly see through the material. The definition online is 
"(of a substance) allowing light, but not detailed shapes, to pass through; semi-transparent"

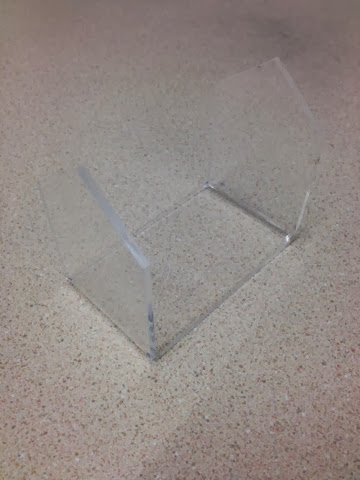
This material used for this particular model is a type of plastic. What's great about this is that it can bend with ease ( malleable) and maintain its shape afterwards. Usually with some plastics you change the shape and it bounces back to its orginal structure, these materials are considered 'smart'. The plastic use for this house is originally from a standard A4 folder (used to protect paper documents so I knew it was reasonably strong).

The construction approach.
-I drew onto the plastic using a pencil and a ruler. The shape was simply a representation of a shell (21.4cmx8cm). I did not want to show the front and back faces, by not showing them I allowed the viewer to imagine it visually.
-I marked the lines of bend (the places where I would shape the material around to form the house). 
-I allowed an extra 3cm on the end of the shape to act as a flap in which the ends could be connected. For the joint I used a glue gun. 

Aesthetics
I love the folds on this house model, due to the properties of the material the plastic noticeable changes colour (white and less transparent). I can't help but feel this is due to the material weakening  or stretching when being folded.

PINE WOOD


This block started as a 10 x 12 wooden piece. At this stage i hadn't  created a solid house model so to me this particular piece was unique. The original block of wood was also uneven (wasn't not a perfect cube/cuboid shape). This consequently produced difficulties in obtaining my miniature house model to scale with all the correct dimensions. If the original block of wood had of been a perfect cube I could have used the edges to produce perpendicular lines that gave me my 90 degree angle.

The construction approach.
Using the band saw to cut the wood was vital. Its by far the most simple and quickest way of removing the excess material. Gloves and goggles had to be worn during the process in order to prevent any injury or damage to my eyes and hands. 
-Firstly i cut two sides of the wood block perpendicular to each other. From this the house construction was made easier to carry out. I then marked onto the surface of the wood the pencil lines for cut (the points at which i could remove unwanted wood leaving the house structure)
-From here onward it was simply a case of marking the correct dimensions and cutting along the edge using the band saw. In order to make sure i was on the line perfectly i cut just outside the mark. This enabled me to then proceed onto the belt sander to remove the rest with a smooth flat surface finish.

Evaluation of material

WOOD DOWEL


Aesthetics
The aesthetics of this particular model are different to other house models that I have made. It's consent is the reason, usually I would have solid plains of material covering the surface but in this design it shows only the wireframe. So I am only showcasing te edges of the house model and in a sense allowing the viewer to visualise or imagine what the rest would look like...it's almost like there is material covering the structure but it's not patently noticeable. 

The construction approach.
-the original dowels came in equal lengths of 20cm each. I realised before I started making the model that due to the properties of the material you can't possibly bend it to a 90'. It simply just doesn't work, the wood snaps after slight adjustment in structure.
-knowing this I realised the simplest way and possibly the only way of doing this would be to cut the correct sizes and connect using glue or some sort of liquid adhesive. So that's what I did. 

The structure is considerably strong and can withstand slight pressure from above. At the start of the construction of the model the glue did not allow for change. In other words I had to make sure that I was as accurate as possible when connecting separate pieces together. 

PERSPEX

By far one of the most pleasing of houses was the Perspex model. It proved to be the most aesthetically pleasing and strongest of the street collection. 

The construction approach.
Initially I started with a raw (30cm by 65cm) 4mm plane of Perspex sheet. The plan at the start was to bend the edges of the house using no heating methods but on my first attempt the material proved to be too brittle. Heating and bending plastics wasn't something I have experimented with before but I knew it was possible with plastic...

-on CAD photoshop a friend and I constructed a shaded region of the model on which to cut. One of the many formats the laser cutter accepts are JPEG files. So I rendered out the PSD file into a JPEG ready to send to the laser cutter. Using another software linked up to the machine I made it so the shaded region was and outline only (so that the cutter knew what lines to follow).
-then I allowed the laser cutter to do wha it does best. The process of cutting into the material took around 2 minutes so wasn't too time consuming. 
-once completed the shape simply popped out of the Perspex sheet leaving a template. This sheet could now be recycled or reused by another student if needed.
-now I knew from my first attempt and bending the Perspex that it wouldn't work without the aid of heat. Thankfully we have a machine in the 3D workshop that bends plastics. The angle at what it does so is up to you...
It involved placing the material over the how wire and allowing the heat to change the molecular structure of the Perspex. The material becomes weaker and from this easily bends. In order to check that my bend was correct I used a tri-square as my guide (90• angle) 

LASER CUTTING PROCESS BREAKDOWN


Monday, 13 January 2014

KITCHEN CLOTH


The material used for this miniature house is kitchen cloth. Due to the manufacture company the colour is blue/white and has cross patterns over the surface. I actually really love this as it gives the house a character, almost it's own name if you like. The pattern also came in handy when I was constructing the model. The lines act as guide lines and I was able to check against the cross sections to see whether I was obtains a straight line or not. This came in handy as it ultimately had an effect on the accuracy and precision of the house. 

the construction approach. 
originally from a pack of ten the cloth came folded up into 4 sections. It was noticeable and obvious that the more layers the stronger the surface of the cloth was. I took this simple information and dissolved it into my mini house model so that it would stand stable and replicate the given dimensions on the brief. 
-firstly I stuck together the two pieces of cloth to give strength to the structure. Then I was able to work much more effectively  
-fold the length of the cloth into 5 sections (3 of which being 5cm in length and the other 2 being 3.2cm)
-then I split the whole cloth into one strip still with the 5 folds present. the strips width was now 8cm (that of the houses width)
-the only way I could connect the strip either end was to form a flap at one end. I sprayed the flap with 3M SPRAY MOUNT and applied pressure to the joint. This consequently looked clean and had a crisp finish that I'm proud of.